Introduction

Ledger is the ending point for all financial transactions. Posting to the ledger is the most critical API in any ERP system. Failure to use the APIs properly will lead to inaccurate financial statements. Every subsystem eventually needs to get their base transaction data into the ledger. This document discuss the functionality and APIs for posting to the ledger.

Ledger structure

The Microsoft Dynamics AX ledger is defined in a manner very similar to manual accounting systems. The ledger contains all adjustment amounts, dates, and related information for all ledger accounts. Any transaction that originates in a subledger, such as customer, vendor, bank, or fixed asset transaction, eventually needs to adjust ledger accounts so that the transaction amounts can be reported on financial statements.

The ledger entries are grouped by journal number and further grouped by voucher number. The journal number is a unique number that identifies a group of ledger adjustments generated through one posting. The adjustments within a journal number can be subgrouped by voucher number. The voucher number could represent a single transaction or a group of related transactions, depending on how the customer has set up their journals. While journal numbers must be unique, voucher numbers may permit duplicates if set up to do so. The adjustments must balance against each other on both a per voucher and journal number basis.


High-level processes

Ledger posting is never initiated directly by the end user. Instead, it is run by processes initiated by the user. When the user posts a purchase order invoice or performs a task, such as inventory closing, the ledger posting APIs are called to generate the required transaction in General Ledger.

Ledger journal API to LedgerVoucher

Any module that implements a new journal will extend journal classes and forms required for the new journal type. Extending the classes should provide the means to generate LedgerJournalTable and LedgerJournalTrans records. Posting of the new journal type should be handled by the base classes.

The following is an example of the APIs used to post a journal.

Example: LedgerJournalCheckPost.postJournal

ledgerVoucher = LedgerVoucher::newLedgerPost();
 
if a ledgerJournalTable record was read
    validate the ledgerJournalTable record
for each ledgerJournalTrans
    if a new voucher is needed
        LVO = LedgerVoucherObject::newVoucher();
        ledgerVoucher.addVoucher(LVO, ...);
 
for each account and amount to post on the ledgerJournalTrans
    // the method creates the necessary ledgerTrans records to post
    ok = this.postTrans();
// post the vouchers after all ledgerJournalTrans records have been read
ledgerVoucher.end();


Non-Ledger journal API to LedgerVoucher

All sub module transactions that post using transaction data from tables other than LedgerJournalTable and LedgerJournalTrans use these APIs to post.

Example: InventoryPostPhysicalPeriodic.postLedgerTrans

ledgerVoucher = LedgerVoucher::newLedgerPost();

transactionTxt = new TransactionTxt();
transactionTxt.setType();
transactionTxt.setVoucher();

// create a new voucher for posting the items together
ledgerVoucherObject = LedgerVoucherObject::newVoucher();

// assign the text to the voucher object and add to the voucher
ledgerVoucherObject.lastTransTxt(transactionTxt.txt());
ledgerVoucher.addVoucher(ledgerVoucherObject);

// if there is a header record to post loop through the lines and add a transaction 
// to the voucher object for each record.

if (inventPostPhysicalTable)
{
    for each inventPOstPhysicalTrans record to post
    {
        // use ledgerVoucher.findLedgerVoucherObject() to retrieve the last voucher object
        // added to the ledgerVoucher. This insures the correct voucher object is used when 
        // creating the LedgerVoucherTransObject
        LVTO = LedgerVoucherTransObject::newCreateTrans(
                                              ledgerVoucher.findLedgerVoucherObject(), ...);
        
        ledgerVoucher.addTrans(LVTO);
    }
}

// this completes the building of the ledgerVoucher.
// the call to end() will initiate the posting of the ledgerVoucher.
ledgerVoucher.end();


Multiple entry non-Ledger journal API to LedgerVoucher

All sub module transactions that post using transaction data from tables other than LedgerJournalTable and LedgerJournalTrans use these APIs to post when multiple journal entries are required.

Example: TaxWithhold.posttaxWithhold

ledgerVoucherGroup = LedgerVoucherGroup::construct();

for each record (<multiple posting table>)
    changecompany(<company of transaction>)
    {
        for each record (<table containing records for the transactions>)
        {
            if (<The criteria for a separate journal entry is met>)
            {
                // get the number sequence specified to generate a voucher number.
                numberSeqRef = <where number sequence is specified>
                numberSeq = NumberSeq::newGetVoucher(numberSeqRef);

                // This is the journal entry for the transaction for the current company
                LedgerVoucher = LedgerVoucher::newLedgerPost();

                // add the voucher to the group
                ledgerVoucherGroup.addLedgerVoucher(LedgerVoucher);
            }

            LVO - LedgerVoucherObject::newVoucher();

            // get the next voucher number and add it to the voucher
            LedgerVoucher.addVoucher(LVO, ...);

            taxWithholdTransLedgerVoucher.findLedgerVoucherObject();

            // use ledgerVoucher.findLedgerVoucherObject() to retrieve the last voucher object
            // added to the ledgerVoucher. This insures the correct voucher object is used when 
            // creating the LedgerVoucherTransObject
            LVTO = LedgerVoucherTransObject::newCreateTrans(
                               ledgerVoucher.findLedgerVoucherObject(), ...);

             // add the transaction to the voucher
             ledgerVoucher.addTrans(LVTO);
         }
    }
}

// this completes the building of the ledgerVoucher.
// the call to end() will initiate the posting of the ledgerVoucherGroup.
ledgerVoucherGroup.end();


Issue: We have a PO that has been received a long time ago and this PO has invoice remainder but when posting the invoice we get an error ofPurchase order: PO702022 – Item number: 00112009 – Insufficient inventory transactions with status Purchased.

Expectation: We  are going to post a invoice of the remaining quantity and then PO status should be ‘Invoiced’.

Solution:

  • Purchase Order: Image
  • PO Line:               Image
  • Inventory transaction:  Image

As you see above, there is a purchase order line that has invoice remainder 125 for item 00112009. however, if you look at the inventory transaction for this item by using Inventory > Transactions you will find 2 open transactions which Receipt status = ‘Received’ need to be invoiced.

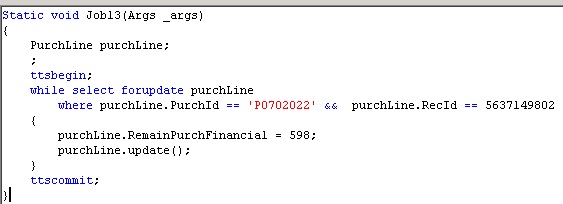
Somehow the data for this PO and item has corrupted and business user want to find a way to close this PO. so what I did is to update the quantity of invoice remainder to match values in the transactions that is 598 (473 + 125) and do post invoice again.


There are lots of example of creating a new custom services in ax 2012. So I am not going to repeat that here again but give you some idea that I have met during development of custom service which handles large dataset.

Symptom #1:

“There was an error while trying to serialize parameter http://tempuri.org:response. The InnerException message was ‘Maximum number of items that can be serialized or deserialized in an object graph is ‘65536’. Chang the object graph or increase the MaxItemsInObjectGraph quota.’. Please see InnerException for more details.”

Solution:

1. Add below in your config file. blank behavior name should apply for all services, including the one created by WCF RIA Services.

<behaviors>

<serviceBehaviors>

<behavior name=“”>

<serviceMetadata httpGetEnabled=”true”/>

<serviceAuthorization impersonateCallerForAllOperations=”false”/>

<dataContractSerializer maxItemsInObjectGraph=”2147483647″/>

</behavior>

</serviceBehaviors>

</behaviors>

Or

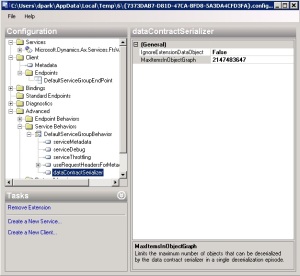
2. Increase the maxItemsInObjectGraph quota value from server side.

    1. Open System administration > Setup > Services and AIF > Inbound ports
    2. Select [your service] and deactivate if needed
    3. Open ‘Configure’ of adapter
    4. Create dataContractSerializer element in service behaviors and increase the value of MaxReceivedMessageSize to 2G.
             

Symtom #2:

“The maximum message size quota for incoming messages (65536) has been exceeded. To increase the quota, use the MaxReceivedMessageSize property on the appropriate binding element.”

Cause:

while net.tcp binding is used for this service, other properties also need to be increased.

Solution:

Increase values in <ReaderQuotas> tag.

<system.serviceModel>

<bindings>

<netTcpBinding>

<binding …… maxReceivedMessageSize=”2147483647″>

<readerQuotas maxDepth=”32″ maxStringContentLength=”2147483647″ maxArrayLength=”2147483647″ maxBytesPerRead=”2147483647″ maxNameTableCharCount=”2147483647″ />

</binding>

</netTcpBinding>

</bindings>

</system.serviceModel>

RelatedTableRole and Query JoinRelation

Posted: April 18, 2012 in AX

This section describes how you can use the RelatedTableRole property to simplify the creation of a new query.

Suppose that on a table relation you enter an explicit value for the RelatedTableRole property. You can then use that value to populate theJoinRelation property on a data source relation under an AOT > Queries > MyQuery node. This enables you to specify the fields of the join in only one location. If the join fields ever change, you must update the join in only one location.

Before you can set a value for the JoinRelation property, you must delete the values for the Field and RelatedField properties.

The following two images show how to use the JoinRelation property.

  1. First image – shows the properties on a table relation, and the value of the RelatedTableRole property is highlighted.

  2. Second image – shows the properties on a data source relation under a query. We see that the value for the JoinRelation property is a copy of the value for the RelatedTableRole.

RelatedTableRole property on a table relation.

The RelatedTableRole property on a table relation

In the next image we see the value for the JoinRelation property is a copy of the value for the RelatedTableRole from the previous image.

The JoinRelation property on a query relation

The JoinRelation property on a relation under a query

original msdn: http://msdn.microsoft.com/en-us/library/cc636647.aspx

In this procedure, you will extend the RunBaseBatch class. Objects of type RunBaseBatch implement all the methods that the system needs in order to run the object as a batch job. You will extend RunBaseBatchto override the run method. The run method contains the logic that handles the particular processing need that you are solving.

To extend RunBaseBatch

  1. Press Ctrl+D to open the Application Object Tree (AOT) in a development workspace.
  2. Right-click the Classes node, and then select New Class.
  3. Expand the node for your new class. Rename it Batch4DemoClass.
  4. Right-click the classDeclaration node under Batch4DemoClass, and then click View Code.
  5. In the code Editor window, after Batch4DemoClass, add extends RunBaseBatch. Save the change.
  6. In the AOT right-click the Batch4DemoClass node, select Override method, and then select the runmethod. Edit the run method to match the code shown in the following example.
  7. Override the methods pack and unpack. Edit them to match the code shown in the following example.
    NoteNote
    For this example, do not yet override the runsImpersonated method. The base method always returns true. true means the batch must run under the authority of the person who scheduled the batch, and that no client session is involved.
    class Batch4DemoClass extends RunBaseBatch
    {
        public void run()
        {
            // The purpose of your job.
            info(strFmt("Hello from Batch4DemoClass .run at %1"
                ,DateTimeUtil ::toStr(
                    DateTimeUtil ::utcNow())
                ));
        }
        public container pack()
        {
            return conNull();
        }
        public boolean unpack(container packedClass)
        {
            return true;
        }
    }

In this procedure, you will write an X++ job that can be run to schedule an occurrence of your batch. Then you will run the job.

To schedule your batch job

  1. In the AOT, right-click the Jobs node, and then select New Job.
  2. In the Editor window, enter the X++ code shown in the following example, and then save the changes.
  3. In the Editor window, press F7 to compile your job, and then press F5 to run your job.
    NoteNote
    The result of your job is that your batch is scheduled to run.
    static void Job_ScheduleBatch2(Args _args)
    {
        BatchHeader batHeader;
        BatchInfo batInfo;
        RunBaseBatch rbbTask;
        str sParmCaption = "My Demonstration (b351)";
        ;
        rbbTask = new Batch4DemoClass();
        batInfo = rbbTask .batchInfo();
        batInfo .parmCaption(sParmCaption);
        batInfo .parmGroupId(""); // The "Empty batch group".
        batHeader = BatchHeader ::construct();
        batHeader .addTask(rbbTask);
        batHeader .save();
        info(strFmt("'%1' batch has been scheduled.", sParmCaption));
    }
  4. Click the Build menu, and then click Generate Incremental CIL.
    This CIL build is necessary because batch jobs that run on the AOS can run only in .NET Framework managed mode.

AOSAuthorization Property on Tables [AX 2012]

Posted: February 22, 2012 in AX

The AOSAuthorization table property enables you to specify which data access operations must undergo user permission checking.

Data Access Operations


The four fundamental data access operations are create, read, update, and delete. These operations are represented in combinations by the following AOSAuthorization enumeration values:

  • None
  • CreateDelete
  • UpdateDelete
  • CreateUpdateDelete
  • CreateReadUpdateDelete

No permission checking is done when the AOSAuthorization property is set to None.

Suppose AOSAuthorization is set to CreateDelete on a given table. In this case, create and delete operations would be allowed to execute only if the Application Object Server (AOS) can confirm that the user has the appropriate permissions. Update and read operations would execute without checking user permissions, because they are not mentioned in the chosen AOSAuthorization value.

An exception is thrown when permission checking finds that the user lacks the necessary permission.

When a new table is created, its AOSAuthorization value is set to None.

The AOSAuthorization property also applies to views.

Performing data access operations on a view will cause permission checking for that view. There will be no underlying permission checking on any table referenced by that view.

For example, suppose view Vew2 reads data from table Tab3. You have no read permission to either Vew2 or Tab3. The AOSAuthorization value on Vew2 is None, but on Tab3 it is CreateReadUpdateDelete. When you try to read from Vew2 the outcome will be a successful retrieval of data.

The permission checking is performed by the AOS. The AOS is called to perform this checking by the following table methods:

  • aosValidateDelete
  • aosValidateInsert
  • aosValidateRead
  • aosValidateUpdate

These methods are invoked once per affected table row. Therefore in some cases they may have a significant impact on performance.

No permission validation occurs when the AOSAuthorization property is set to None. In these cases the method skipAOSValidation is used instead. This executes only one time for the entire operation, which reduces the risk of slow performance.

For more information about these table methods, see Table Methods.

Notice the calls to methods assert and skipAosValidation. Between these two methods the call toassert does need to occur first.

server static void JobPermAssertSkip(Args _args)
{
    AssetTable tabAt;
    SkipAOSValidationPermission perm;
    ;
    ttsbegin;
    perm = new SkipAOSValidationPermission();
    perm.assert();
    tabAt.skipAosValidation(true);
    update_recordset tabAt
        setting MaintenanceInfo3 = "Useful information."
        where tabAt.AssetId == "goodvalue";
    ttscommit;
}
server static void JobUnchecked(Args _args)
{
    LedgerTrans.skipTTSCheck(true);
    select firstonly forupdate LedgerTrans
    where LedgerTrans.RecId == 123;
    if (LedgerTrans.RecId)
    {
        LedgerTrans.Txt = 'Hello';
        unchecked(Uncheck::TableSecurityPermission)
        {
            LedgerTrans.doUpdate();
        }
    }
}

Log entries related to table permissions are written when an exception is thrown due to permission checking finding that the user lacks the necessary permission.

When executing a secured server method or service operation in checked mode the AOSAuthorization property is always ignored and permissions are checked for all operations on all tables within the method.

Create new financial dimension

Posted: June 3, 2011 in AX

Of course there is an automatic/easy way to add new dimension by using tools > Development tools > Wizards > Financial Dimension Wizard. but this way only allows you to add dimension but can’t modify current one. 

original post: http://sumitsaxfactor.wordpress.com/2007/05/11/creation-of-new-financial-dimension/

Many a times there is requirement from many customers to create a new financial dimension in AX apart from the three standard dimensions “Department”, “Cost center” and “Purpose”. Here is a step by step description of creating a new financial dimension.
To create a new financial dimension modify following objects one by one
    • Base enum “SysDimension” : Find this base enum and right click on this base enum -> Select option “New element”. In properties window give a name to this element say “TestDim” and label as “Test dimension”. Save the base enum.
    • Extended data type “Dimension” : Find this EDT and then add a new array element in this EDT. Name this array element as “TestDim”. In properties window specify label as “Test dimension”. Now in the “Relations” tab of this new array element add a new “Normal”  relation first. To this normal relation open properties window and set property Table as “Dimensions” and Related field as “Num”. Now add another relation of type “Related field fixed”. To this related field fixed relation open properties window and set Related field as “DimensionCode” and property value as “3” (this is the value of the new enum element created in SysDimension). Save the EDT.
    • Extended data type “DimensionCriteria” : Repeat the process of modification as done for EDT “Dimension” above.
    • Extended data type “XMLMapDimension” : Find this EDT in AOT and then create a new array element for this EDT. Label this array element as “Test document value”. Save the EDT.
    • Extended data type “MandatoryDimension” : Find this EDT in AOT and then create a new array element for this EDT. Label this array element as “Validate test dimension”. Save the EDT.
    • Extended data type “DimensionLedgerJournal” : Find this EDT in AOT and then create a new array element for this EDT. Label this array element as “Test dimension”. Save the EDT.
    • Extended data type “DimensionKeepFromTransaction” : Find this EDT in AOT and then create a new array element for this EDT. Label this array element as “Keep transaction test dimension”. Save the EDT.
    • Extended data type “COSAllowDimensions” : Find this EDT in AOT and then create a new array element for this EDT. Label this array element as “Test dimension”. Save the EDT.
    • Extended data type “DimensionPriority” : Find this EDT in AOT and then create a new array element for this EDT. Label this array element as “Test dimension”. Save the EDT.
    • Extended data type “DimensionAllocation” : Find this EDT in AOT and then create a new array element for this EDT. Label this array element as “Test dimension”. Save the EDT.
    • Table “LedgerJournalTrans” : Find this table in AOT and add a new relation in the relations tab as follows. Create a new relation in relations tab and name it as say “interCoDimension3” (You can see three more similar relations with suffix 0, 1 and 2 for three standard dimensions). Now set the property table of this relations as “Dimensions”. Create a new “Normal” relation under this realtion tab and set the property “Field” = “OffsetCompany” and property “RelatedField” = “dataAreaId”. Create another “Normal” relation under this relation tab and set the property “Field” = “InterCoDimension[4]” and property “RelatedField” = “Num”. Now create a new “Related field fixed” relation under this tab and set property “Value” = 3 (this is the value of the new enum element created in SysDimension) and property “Related field” = “DimensionCode”. Save the changes.

    • Extended data type “DimensionLedgerAllocCriteria” : Find this EDT in AOT and then create a new array element for this EDT. Label this array element as “Test dimension”. Save the EDT. (missing from original post)
    • Extended data type “DimensionExtCodeId” : Find this EDT in AOT and then create a new array element for this EDT. Label this array element as “Test dimension”. Save the EDT. (missing from original post)

The new financial dimension is successfully created in AX and can be viewed in different forms through out the AX where ever dimensions are used.

Reporting Services Error


  • For more information about this error navigate to the report server on the local server machine, or enable remote errors

    SQL Server Reporting Services

Resolution:

How to: Enable Remote Errors (Reporting Services Configuration)

ERROR MESSAGE:

Error: Deployment failed unexpectedly with the message:
Not found
See the log file for further details.

Deployment failed with the following exception:
System.Management.ManagementException: Not found
   at System.Management.ManagementException.ThrowWithExtendedInfo(ManagementStatus errorCode)
   at System.Management.ManagementObject.Initialize(Boolean getObject)
   at System.Management.ManagementBaseObject.get_Properties()
   at System.Management.ManagementBaseObject.GetPropertyValue(String propertyName)
   at Microsoft.Dynamics.Framework.Deployment.Reports.SrsWmi.get_InstanceName()
   at Microsoft.Dynamics.Framework.Deployment.Reports.WmiUtilities.<>c__DisplayClass1.<GetInstalledWmiInstance>b__0(SrsWmi s)
   at System.Linq.Enumerable.FirstOrDefault[TSource](IEnumerable`1 source, Func`2 predicate)
   at Microsoft.Dynamics.Framework.Deployment.Reports.WmiUtilities.GetInstalledWmiInstance()
   at Microsoft.Dynamics.Framework.Deployment.Reports.WmiUtilities.GetReportServerConfigPath()
   at Microsoft.Dynamics.Framework.Deployment.Reports.ReportLibraryDeployer.DeployBusinessLogicAssemblies(IEnumerable`1 businessLogicAssemblies, DeploymentLogger logger)
   at Microsoft.Dynamics.Framework.Deployment.Reports.ReportLibraryDeployer.Deploy(IEnumerable`1 reportLibrariesToDeploy, IEnumerable`1 transitiveReferenceClosure, IEnumerable`1 cultures, DeploymentLogger logger, Func`2 connectionStringModifier)
Assemblies in app domain:
    [FullName = 'AxReports, Version=5.0.0.0, Culture=neutral, PublicKeyToken=31bf3856ad364e35', assemblyFileVersion = '5.0.593.0']
    [FullName = 'Microsoft.Dynamics.BusinessConnectorNet, Version=5.0.0.0, Culture=neutral, PublicKeyToken=31bf3856ad364e35', assemblyFileVersion = '5.0.593.0']
    [FullName = 'Microsoft.Dynamics.Framework.BusinessConnector, Version=5.0.0.0, Culture=neutral, PublicKeyToken=31bf3856ad364e35', assemblyFileVersion = '5.0.593.0']
    [FullName = 'Microsoft.Dynamics.Framework.Design.Modeling, Version=5.0.0.0, Culture=neutral, PublicKeyToken=31bf3856ad364e35', assemblyFileVersion = '5.0.593.0']
    [FullName = 'Microsoft.Dynamics.Framework.Design.ReportsMetamodel, Version=5.0.0.0, Culture=neutral, PublicKeyToken=31bf3856ad364e35', assemblyFileVersion = '5.0.593.0']
    [FullName = 'Microsoft.Dynamics.Framework.Reports, Version=5.0.0.0, Culture=neutral, PublicKeyToken=31bf3856ad364e35', assemblyFileVersion = '5.0.593.0']
    [FullName = 'Microsoft.Dynamics.Framework.ReportsDeployment, Version=5.0.0.0, Culture=neutral, PublicKeyToken=31bf3856ad364e35', assemblyFileVersion = '5.0.593.0']
    [FullName = 'Microsoft.VisualStudio.Modeling.Sdk, Version=9.0.0.0, Culture=neutral, PublicKeyToken=b03f5f7f11d50a3a', assemblyFileVersion = '9.0.21022.8']
    [FullName = 'mscorlib, Version=2.0.0.0, Culture=neutral, PublicKeyToken=b77a5c561934e089', assemblyFileVersion = '2.0.50727.5444']
    [FullName = 'msvcm90, Version=9.0.30729.4940, Culture=neutral, PublicKeyToken=b03f5f7f11d50a3a', assemblyFileVersion = null]
    [FullName = 'System, Version=2.0.0.0, Culture=neutral, PublicKeyToken=b77a5c561934e089', assemblyFileVersion = '2.0.50727.5420']
    [FullName = 'System.Configuration, Version=2.0.0.0, Culture=neutral, PublicKeyToken=b03f5f7f11d50a3a', assemblyFileVersion = '2.0.50727.5420']
    [FullName = 'System.Core, Version=3.5.0.0, Culture=neutral, PublicKeyToken=b77a5c561934e089', assemblyFileVersion = '3.5.30729.5420']
    [FullName = 'System.Drawing, Version=2.0.0.0, Culture=neutral, PublicKeyToken=b03f5f7f11d50a3a', assemblyFileVersion = '2.0.50727.5420']
    [FullName = 'System.Management, Version=2.0.0.0, Culture=neutral, PublicKeyToken=b03f5f7f11d50a3a', assemblyFileVersion = '2.0.50727.5420']
    [FullName = 'System.Web, Version=2.0.0.0, Culture=neutral, PublicKeyToken=b03f5f7f11d50a3a', assemblyFileVersion = '2.0.50727.5420']
    [FullName = 'System.Web.Services, Version=2.0.0.0, Culture=neutral, PublicKeyToken=b03f5f7f11d50a3a', assemblyFileVersion = '2.0.50727.5420']
    [FullName = 'System.Windows.Forms, Version=2.0.0.0, Culture=neutral, PublicKeyToken=b77a5c561934e089', assemblyFileVersion = '2.0.50727.5420']
    [FullName = 'System.Xml, Version=2.0.0.0, Culture=neutral, PublicKeyToken=b77a5c561934e089', assemblyFileVersion = '2.0.50727.5420']
The deployment log file can be found at "C:\Users\dpark\AppData\Local\Temp\tmpFF1C.txt"

RESOLUTION:

If every other pre-requisites are installed correctly, make sure you applied this hotfix. 
the articles include hotfix for allowing you to install Analysis and reporting extension for SQL 2008.
KB Article numbers: 957312, 957654 (https://mbs2.microsoft.com/Knowledgebase/KBDisplay.aspx?scid=kb$en-us$957312&wa=wsignin1.0&wa=wsignin1.0)
ps). this should be done even though you have AX 2009 SP1 installed.

Original post:  http://blogs.msdn.com/b/emeadaxsupport/archive/2010/01/11/ax-2009-setup-fails-to-install-iis-components-on-windows-server-2008-r2.aspx

This issue only affects users of Windows Server 2008 R2. One of the pre-reqs for installing Role Centers and Enterprise Portal and/or Reporting Extensions or Workflows is that you must have IIS installed locally on the server.

If this is not installed and/or is partially installed with some required IIS Role Services missing then during AX Setup, you will get prompted to install IIS Components as a pre-req.

Clicking on the button to install the pre-reqs, fires of a command that uses the servermanagercmd.exe on a Windows Server 2008 and above to install the IIS components. It uses the ServerManagerCmdInputIIS.xml file as the input file to the servermanagercmd command.

This works fine on a Windows Server 2008 system, and it will install the IIS components successfully (assuming you had the proper rights and priviledges), however it fails to install the components on a Windows Server 2008 R2. See the attached IISComponentsInstallationError.PNG file for the error that is displayed

Furthermore, the following error is logged in the IISInstall.Log file that is generated where the DynamicsSetupLog file is created:

[ServerManagerCmd] Error (Id=0) ArgumentNotValid: Feature not valid: ‘NET-XPS-Viewer’. The name of the feature was not found.

The issue ocurs because within the ServerManagerCmdInputIIS.xml file there is a feature listed for installation called “NET-XPS-Viewer”, this feature name has now changed to “XPS-Viewer” on Windows Server 2008 R2, and hence it fails to find the feature and installation aborts.

To workaround the issue, browse to the folder where the AX 2009 setup files are copied to, then, edit the ServerManagerCmdInputIIS.xml file (which is located in the support folder) in notepad, and change the following line

from:

<Feature Id=”NET-XPS-Viewer” />

to:

<Feature Id=”XPS-Viewer” />

Save the file and you should now be able to re-run AX 2009 setup, and install the IIS components during the pre-req installation phase.

Further Information:

You can also copy and run the following command between the quotes, in an elevated command prompt on Windows Server 2008 R2, to install all the IIS components that are required, prior to running the AX 2009 setup to achieve the same result:

“ServermanagerCMD -install Web-Static-Content Web-Default-Doc Web-Dir-Browsing Web-Http-Errors Web-Asp-Net Web-Net-Ext Web-ISAPI-Ext Web-ISAPI-Filter Web-Http-Logging Web-Request-Monitor Web-Filtering Web-Stat-Compression Web-Mgmt-Console Web-Metabase Web-WMI Web-Lgcy-Scripting Web-Lgcy-Mgmt-Console Web-Windows-Auth NET-Framework-Core XPS-Viewer RSAT-Web-Server WAS-Process-Model WAS-NET-Environment WAS-Config-APIs -logPath %TEMP%\IISInstall.log”

NOTE: The above command should be one single command without any carriage returns or line feeds. Check the log file in IISInstall.log for the installation status.